Lasagna Soup

Image

In my recent pinning extravaganza on Pinterest, I came across this recipe for lasagna soup. The first time I saw it, I thought, “that could be interesting.” The fourth time I saw it, I thought, “hmmm, I should try that.” The tenth time I saw it, I caved.

So being myself, I couldn’t leave the recipe as it was, and made a few alterations.
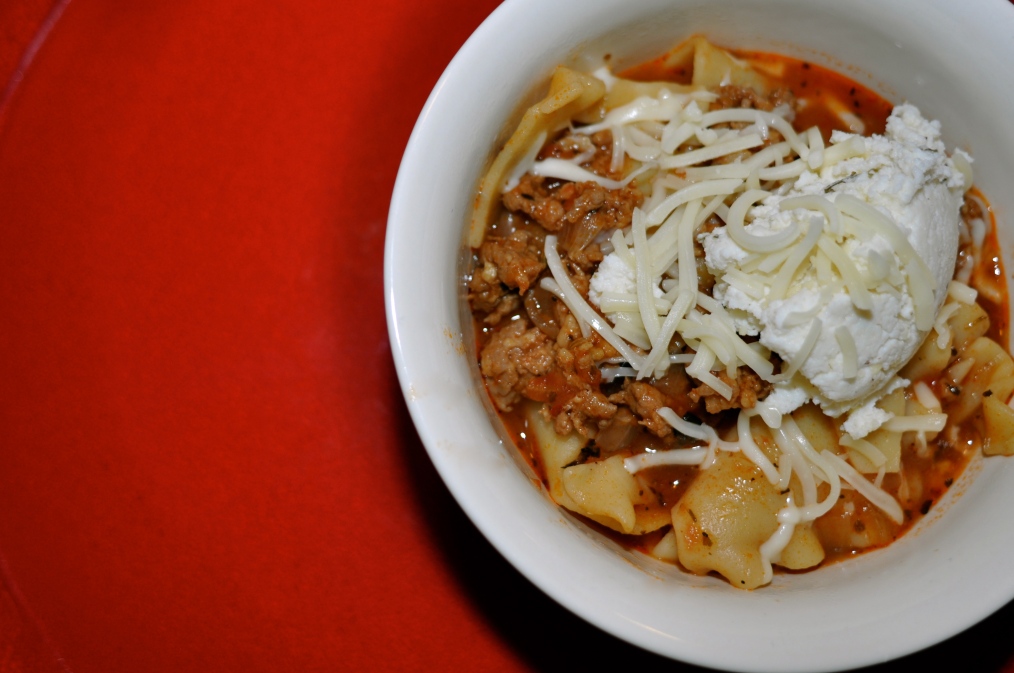
RECIPE:

for the soup:
1 tsp. olive oil
1 lbs. Italian sausage
1 medium onion, chopped
2 garlic cloves, minced
2 t dried oregano
2 t dried basil
2 t dried italian seasoning
1/2 t crushed red pepper flakes
2 T tomato paste
1 14.5 oz. can fire roasted diced tomatoes
1/2 cup red wine
1 bay leaf
5 c chicken stock
8 oz mafalda or fusilli pasta (I used lasagna noodles that I broke into smaller pieces)
salt and freshly ground black pepper, to taste

for the cheesy yum:
8 oz ricotta
1/2 c grated Parmesan cheese
1/4 t salt
pinch of freshly ground pepper
1 t dried parsley
1/2 c shredded mozzarella cheese

Heat olive oil in a large pot over medium heat. Add sausage, breaking up into bite sized pieces, salt and pepper, and brown for about 5 minutes. Add onions and cook until softened, about 6 minutes. Add garlic, oregano, basil, and red pepper flakes. Cook for 1 minute. Add tomato paste and stir well to incorporate. Cook for 3 to 4 minutes, or until the tomato paste turns a rusty brown color, then add the wine.

Add diced tomatoes, bay leaf, and chicken stock. Stir to combine. Bring to a boil and then reduce heat and simmer for 30 minutes. Add uncooked pasta and cook until al dente. Do not over cook or let soup simmer for a long period of time at this point, as the pasta will get mushy and absorb all the soup broth. You may even want to consider cooking the noodles separately, and then adding some to individual bowls before ladling the soup over them. This would be an especially smart move if you are anticipating any leftovers. {I did cook the noodles separately and added them later.} Right before serving, season to taste with salt and freshly ground black pepper.

While the pasta is cooking, prepare the cheesy yum. In a small bowl, combine the ricotta, Parmesan, salt, and pepper.

To serve, place a dollop of the cheesy yum in each soup bowl, sprinkle some of the mozzarella on top and ladle the hot soup over the cheese.

Servings:  6

Once again: check out the original from a Farmgirl’s Dabbles

 Image

10 months & Rosemary Sea Salt Ciabatta

Image

My little man is 10 months old and so much fun. He has been growing and changing so rapidly this month; in the past week he has said his first word, stood for the first time, taken his first step, and used a fork to eat his food. (I realize the last one seems out of league with the others, but this mama is thrilled for the fork!) I usually don’t get emotional about these things, but with so many in so few days, I’ve had a difficult time processing the magnitude of his rapid growth. I feel like blinking will cause me to miss something! And, I don’t want to miss it. This morning, I nearly missed him clap for the first time. Another first this week! My goodness. And since he is nearly 11 months, it is time to start “officially” planning his first birthday party. One word: mustaches. Awesome, right?

Image

I have also spent a lot of this month baking. I threw my friend Heather a baby shower last weekend with my friend Stefanie and we made an assortment of treats that I will blog about soon. I have also been trying some new breads from my Artisan Bread in Five Minutes a Day book. I took a different spin on the ciabatta bread which resulted in deliciousness that you won’t want to miss out on.

Rosemary & Sea Salt Ciabatta
RECIPE: (makes 2 loaves)

5 1/2 cups bread flour
3 cups warm water + 1 cup hot water reserved
1 1/2 T kosher sea salt + 1 t reserved
1 1/2 T active dry yeast
1 T dried rosemary

You will need a bread stone, metal baking dish, and 5 qt tupperware. A stand mixer with a dough hook attachment is what I use to mix together my dough, but you can also do it by hand in the tupperware.

Mix water, sea salt, and yeast together. Add bread flour and mix until incorporated. Transfer to tupperware and cover for 2 hours (it is important that tupperware is NOT airtight). Refrigerate dough at least 30 minutes before working with it. The best thing about this dough is that it will last in the refrigerator up to two weeks. So make one loaf this week, and make another when you run out!

When you are ready to bake your bread, put the bread stone on the middle rack of the oven. On the rack below it, but the metal dish to one side to use for a steam bath. Heat oven to 450 F.

Meanwhile, wet your hands and take half of your dough (about 2 lbs) and quickly shape it into a ball by pulling out from the center and tucking that section under the ball. Once you have a ball, start working the dough out into a flat oval, keeping it at least 3/4 of a inch thick. If you need to wet your hands again to keep the dough from sticking, do so. Allow the dough to rest for 20 minutes on a dough paddle or flat cookie sheet that has been generously dusted in white flour. Crack reserved sea salt on dough and sprinkle rosemary over the top surface.

After 20 minutes, slide dough onto bread stone, then pour the reserved hot water into the metal dish and quickly shut the oven. Cook for 20 minutes until lightly golden. Remove bread from oven with paddle and allow to rest for 10-15 minutes before slicing into it.

I recommend serving it with an olive oil dipping sauce. Crack sea salt and pepper into a small dish, add parmesan cheese and top with olive oil. Get creative with it! Add red peppers, olives, or other spices to add some flare to your bread!

Image

Chicken Tortilla Soup

Image

One might assume that having grown up in Arizona, I would love both Mexican food and spicy food. Both of those assumptions would have made an… well, you know the saying. Until recently, that is. Something in the last year or so (perhaps pregnancy?) has altered my taste buds and I am so happy about it!

For the longest time, I couldn’t eat spicy foods because it gave me terrible reflux and indigestion. Then, I realized that the spiciness wasn’t the issue; the fat content was. I can eat spicy food without any negative side effects as long as the dish is low in fat content. Score! One my go to dishes to accomplish this new love of low-fat, spicy food is chicken tortilla soup.

Not to toot my own horn, but this soup is seriously delicious. Seriously. And, it is pretty darn easy. Try it. Let me know what you think!

RECIPE:

2 boneless, skinless chicken breasts, diced into 1 inch pieces and patted dry
1 onion, diced
3 cloves garlic, minced
2-4* jalapeños, diced and seeded
2 cans fire roasted tomatoes (or fresh!)
1 zucchini, diced
1 yellow squash, diced
1-2 cans black beans, rinsed
2 quarts chicken broth
6-8 white or yellow corn tortillas
2 T olive oil
1 t kosher salt
1/2 cup fresh cilantro, chopped
1 T oregano
1 T lime juice
1/2 cup greek yogurt (or sour cream)
1 avocado, diced
salt and pepper to taste
optional: 1 t agave nectar or honey (to cut out a bit of the acidity)
optional: 1 lime, quartered or sliced thinly

In a large stockpot, over medium high heat, sauté onions, jalapeños, and garlic in 1 T olive oil until onion is clear and jalapeño is slightly caramelized. Add chicken and sear until slightly browned on all sides. Add fire roasted tomatoes, black beans, chicken broth, salt, and pepper, and oregano, bring to a boil, then simmer. Add zucchini and squash, cilantro, lime juice, and agave nectar. Simmer for 30 minutes. Taste test and adjust seasonings. (Allow soup to continue simmering while you make the tortillas.)

Meanwhile, heat oven to 400 F. Thinly coat both sides of corn tortillas in olive oil. (I lay one tortilla flat, pour a bit of olive oil on it, and swirl another tortilla on top of it to lightly coat them both all over and repeat until all sides are coated.) Season tortillas with kosher salt and bake in the oven 20 minutes (or until golden), flipping half way through. Remove from oven, cut into strips with a knife or crack them by hand. (I swear making your own chips is the difference between good and great tortilla soup.)

To garnish, ladle soup into bowls, add a dollop of greek yogurt, a handful of avocado, 1 lime wedge or slice, and a sprig of fresh cilantro. I’m telling you, this soup is so good, you don’t even need cheese! And when do you not need cheese? (In the picture above, I am missing the cilantro and lime, and I used what I had on hand, aka tortilla chips from a bag, thus the cheese.)

Ok, now go make it yourself and tell me what you think! For those of you who don’t like spice, just use one seeded jalapeño and see what you think. It should be easily palatable. For those of you who like extra spice, add some cayenne. Yum! And to boot, this soup can be frozen!!! In fact, we defrosted some earlier this week and it was delicious.

*note: the seeds are what make jalapeños so spicy, so I remove them and put them to the side, adding them slowly as I want more heat. also, wear gloves when chopping jalapeños, and wash your hands in white vinegar when you are done! the vinegar will remove the chemicals from your skin.

Zoolights

While we were in Phoenix last week, we invited my family to join us at Zoolights. We got there just after 6 and spent about an hour braving the crowds and enjoying the lights. Meanwhile, I was trying out my new lens I got for Christmas!! It is a Nikkor 24mm 2.8D to go on the Nikon D90 my stepdad gave me this summer! (Insert giddy laugh here!)

And a picture of the whole gang, to end the lot. :)

Oh wait, I caught this gem…

Way to go, Maebelle. Dig on.

A New Year

What a crazy, event filled year it has been for our little family. I could recap, but would prefer to look forward into our hopes for this next year. Toby will turn 1 in March; we are finally going to see Radiohead live; David’s 10 year reunion is this year; we may move into a house; we will celebrate 7 years of togetherness; and I am resolute to making homemade peach ice cream this summer. I am excited to see all of the blessings this year will bring, knowing fully it will have hardships as well. I plan to blog more often, and facebook less in this year, so keep a look out for us!

Our Family Photos

We asked our dear friend, Josh, of Joshua Cook photography to take our family photos this year. He has become our go to family photographer (he shot our maternity photos and Toby’s newborn photos) and we couldn’t be more thrilled with his work. For this shoot, we walked around old town Superior and enjoyed being outside on a brisk November day. Let me know what you think!ImageImageImageImageImageImageImage 

Homemade Salted Caramel & Vanilla Bean Marshmallows

Image

In my addiction to surfing Pinterest, I have come across some tasty recipes and unique ideas for homemade gifts. One such find was homemade marshmallows for DIY s’mores kits to give out for Christmas. Of course, I had to try them out before I gave them as gifts! So, I enlisted my friend Ari and we got to it. We followed this recipe from the Smitten Kitchen because one: it sounded delicious and two: she had step by step pictures to follow! I halved her recipe and used two 8×8 pans so that I could try out different flavors without having to eat 96 marshmallows. Yikes!

Springy, Fluffy Marshmallows 
Adapted from Gourmet, December 1998

Makes about 48 1-inch cubed marshmallows

About 1/2 cup confectioners’ sugar
1 3/4 envelopes (1 T plus 1 1/4 t) unflavored gelatin
1/2 cup cold water, divided
1 cups granulated sugar
1/4 cup light corn syrup
1/8 t salt
1 large egg whites (or reconstituted powdered egg whites)
1 T Van Gogh Dutch Caramel vodka
Freshly cracked kosher salt
(For vanilla bean: scrape half of one vanilla bean and add to mixture with 1 t vanilla extract)

Note: You can also add food coloring to jazz them up! Just use a small amount.

Oil bottom and sides of a 8 x 8 in rectangular metal (I used pyrex) baking pan and dust bottom and sides with some confectioners’ sugar.

In bowl of a standing electric mixer or in a large bowl sprinkle gelatin over 1/4 cup cold cold water, and let stand to soften.

In a 3-quart heavy saucepan cook granulated sugar, corn syrup, second 1/4 cup of cold water, and salt over low heat, stirring with a wooden spoon, until sugar is dissolved. Increase heat to medium and boil mixture, without stirring, until a candy or digital thermometer registers 240°F, about 12 minutes. Remove pan from heat and pour sugar mixture over gelatin mixture, stirring until gelatin is dissolved.

With standing or a hand-held electric mixer beat mixture on high speed until white, thick, and nearly tripled in volume, about six minutes if using standing mixer or about 10 minutes if using hand-held mixer. (It should look like marshmallow creme at this point.)

In separate medium bowl with cleaned beaters beat egg whites (or reconstituted powdered whites) until they just hold stiff peaks. Beat whites and caramel vodka (or your choice of flavoring) into sugar mixture until just combined. Pour mixture into baking pan and don’t fret if you don’t get it all out. Sift 1/8 cup confectioners sugar evenly over top. {For salted caramel marshmallows: Lightly crack kosher salt over marshmallows.) Chill marshmallow, uncovered, until firm, at least three hours, and up to one day. (Okay, so I cheated here. I put them in the freezer to chill for about 30 minutes and found them ready to cut.)

Run a thin knife around edges of pan and invert pan onto a large cutting board. Lifting up one corner of inverted pan, with fingers loosen marshmallow and ease onto cutting board. With a large knife trim edges of marshmallow and cut marshmallow into roughly one-inch cubes. (I used an oiled pizza cutter.) Sift remaining confectioners’ sugar back into your now-empty baking pan, and roll the marshmallows through it, on all six sides, before shaking off the excess and packing them away.

Marshmallows keep in an airtight container at cool room temperature 1 week, though I doubt they will last that long.

Next time I am going to try strawberry and peppermint marshmallows!

Homemade Bagels – no kneading necessary!

20111117-100442.jpg

I’ve been quiet the last few weeks, but not because life has been quiet. In fact, I’ve been baking up a storm: homemade bagels, soft pretzels, lemon curd pie, flourless chocolate torte, salted caramel marshmallows, vanilla bean marshmallows, and more! I will be blogging about a few of these adventures, but I thought I would share the bagel recipe first because it is so easy and so delicious! Let’s face it, good bagels come from bagel shops and are too expensive to regularly indulge in. This recipe makes 10-12 bagels (depending on how big you make them) and costs a mere fraction of what it would be to get a dozen bagels from your favorite shop. And they are delicious!!!

Recipe:

For Dough
1 1/2 T sugar
1 1/2 T kosher salt
1 1/2 T rapid yeast
3 cups warm water
6 1/2 cups bread flour

For Baking:
8 cups water
3 T sugar
1 t baking soda
Flour for work surface
Whole wheat flour for bread peel
Toppings: sesame seeds, dried onion, poppy seeds, etc.
Pizza Peel, Bread Stone, and Metal Dish

Combine sugar, salt, yeast and water in 5 qt stand mixer with dough attachment. Add flour and mix until combined. Cover and allow to rise 2 hours. Refrigerate for up to 2 weeks.

When ready to make bagels, lightly dust surface of dough with flour and break off a 3 oz or small peach sized piece of dough. Quickly stretch and shape the dough into a ball. Repeat until all dough is used. Allow to rise covered with saran wrap for 20 minutes. Meanwhile boil 8 cups of water in a large stockpot. Preheat oven to 450 F (20 min) with baking stone on center rack, and a metal dish on bottom rack. Once the water is boiling, lower heat to simmer and add sugar and baking soda.

Take a dough ball and make a hole in the center. Slowly stretch out the center until the hole is 2x the diameter of the dough wall. Drop the dough in the simmering water and cook for 2 minutes, then flip it over and cook one more minute.

20111117-102526.jpg

Take bagel out and lay on a clean kitchen towel dusted in flour. Repeat until all bagels are boiled. (I did three at a time, but you need to be careful not to crowd them in the pot or they will become misshapen.)

Transfer 5-6 bagels to pizza wheel dusted in whole wheat flour. Add toppings to bagels and slide onto hot stone.

Pour 1 cup hot water into metal pan in oven and quickly shut the door to create a steam bath. Cook bagels 12-15 minutes until slightly golden or longer if you want crispier bagels. Remove and allow to cool on wire rack. Repeat until all bagels are cooked. Enjoy slightly warm with cream cheese or toppings of your choice!

halloween

The wait is over! For Halloween this year we went as Newsies. If you haven’t seen this early 90s Disney musical classic starring a young Christian Bale, you haven’t truly lived! That may be a bit dramatic, but it did come out when I was 7, so it is rooted in the memory of some of my most dramatic times in life. (I totally had a crush on Brooklyn and swooned every time I saw him on screen.)

I know I said we were going to do something out of Harry Potter, but we had everything we needed for Newsies, so I adjusted my plan. On that note, we were going to dress Toby up as a mandrake root and be Hogwarts students taking care of him (wearing our earmuffs, of course). He is such a fantastic screamer that we thought baby mandrake root (and its ability to knock you out with its screams) was hilariously perfect.

Another thought: a teapot. This kid gets all worked up and then shouts. In fact, people have confused our teapot for Toby. Ha!

Great ideas, too few parties to see them all into fruition, but we loved our Newsie costumes. I am already gathering ideas for next year. (I love dressing up!) What fun, homemade Halloween costume ideas do you have for little kiddos or the whole family?

Here’s a picture of Toby with his BFF Henry and Miss Rachael and myself. Henry went as the E*trade baby and Rachael and her husband went as his geeky parents. Cute!


pumpkins!

Image

IMG_3463

So we took our little pumpkin to the pumpkin patch this weekend. All in all, not our best family outing due to how ridiculously overcrowded it was; however, we still enjoyed the sunshine, views of the Rockies, and company of each other. Toby was more interested in the hoards of people than the pumpkins, but I can’t say I blame him. There were some interesting people…

I’m going to go out on a limb and say Toby’s favorite part was sitting in the dirt, trying to eat dead leaves. If I had any doubts as to what the next 10 years are going to look like with our little man, he affirmed that it will be an adventure trying to encourage good things and discourage not so good things – like eating dirt, leaves, bugs, etc.

I mean, he’s already quite mobile and on his way to walking (at 7 months!), what was I really expecting?! Toby is going to give me a run for my money and I will enjoy (nearly) every second of it! :)

My favorite thing about this whole day… Toby’s hair basically matches his sweater or the pumpkins depending on the light! How cute is that!? Now on to his Halloween costume. I’m having trouble deciding which one to go with. We’ve thought of a few really good ones. Just when I’ve made up my mind, I change it again. You’ll have to stay tuned to find out what I eventually stick with – I will give a hint though, both can be found in Harry Potter, though one is a bit more fantastical than the other.